
Guide
ChatGPT flowchart: let AI draw it, then edit it yourself
You can make a flowchart with ChatGPT in three ways: ask for Mermaid code, ask for an image, or connect ChatGPT to a diagram tool through MCP. For a flowchart you can keep editing, the third works best: connect flowdraft to ChatGPT or Claude once, describe your process, and the AI draws a real flowchart in your flowdraft account and shows you a picture of it in the chat.
3 ways to make a flowchart with ChatGPT
Ask ChatGPT or Claude to “turn this process into a flowchart” and you’ll get one of three things back.
1. Ask for Mermaid code
The AI writes the flowchart in a text-based diagram language such as Mermaid, which you paste into a Mermaid-compatible editor. It’s fast and can live next to your code, but the layout engine decides where boxes go, every fix means pasting new code, and one syntax error means nothing renders.
2. Ask for an image
An image-capable model draws the flowchart as a picture. That can do for a rough slide sketch, but box text and arrows don’t always come out right, and since it’s a flat image, every change regenerates the whole picture.
3. Connect a diagram tool through MCP
MCP (Model Context Protocol) is an open standard for connecting AI assistants to outside tools. Add the flowdraft MCP server to ChatGPT or Claude and the AI builds a real, editable flowchart in your flowdraft account (step cards, decision diamonds, swimlanes, labeled connections) that you can change in the editor.
| Mermaid code | Image | flowdraft via MCP | |
|---|---|---|---|
| What you get | Code as text | A flat picture | An editable flowchart in your account |
| Editing by hand | Change the code | Not really | Move boxes, edit text in the editor |
| Asking for changes | Paste new code again | Whole image redrawn | Same flowchart updated, new picture in the chat |
| Reading existing flowcharts | Only pasted code | No | Your saved flowcharts and the open one |
| Catch | Syntax errors, automatic layout | Wrong text and arrows | One-time setup; connector support depends on your AI plan |
How the flowdraft flowchart MCP server works
Once it’s set up, the loop is always the same:
- You describe the process: who does what, where decisions happen, where it ends.
- The AI creates a flowchart in flowdraft: steps as cards, decisions as diamonds, start and end as pills, teams as swimlanes.
- A PNG of it appears in the chat (in Claude and ChatGPT). The AI sees it too and can fix overlapping boxes or cut-off text.
- You ask for changes (“move the approval step before the warehouse”), and the AI updates the same flowchart and shows the new picture.
- The flowdraft.tech/?p=… link opens it in the editor for fine-tuning by hand and PNG, SVG or JSON export.
It works the other way too: say “review the flowchart I have open” and the AI reads what’s open in flowdraft, unsaved changes included. It asks you to save before changing it, so your manual edits aren’t overwritten.
Setup for ChatGPT, Claude, Claude Code, Cursor and VS Code
Every tool works the same way: add https://flowdraft.tech/mcp to its connector settings, sign in with your flowdraft account on the page that opens and click Allow. No account yet? Open flowdraft and choose Sign in → Sign up; it’s free. The MCP setup guide has every step in detail.
ChatGPT
- Turn on Developer mode in Settings → Security and login (on some accounts it’s under Apps & Connectors → Advanced settings).
- On Apps & Connectors, click Create: name flowdraft, the URL above, authentication OAuth. Confirm you trust the app, then sign in and click Allow.
- In a new chat, pick + → Developer mode → flowdraft. ChatGPT asks you to confirm write actions.
Claude (claude.ai and the desktop app)
- On claude.ai, open Customize → Connectors and click + → Add custom connector.
- Name it flowdraft, paste the URL, click Add and then Connect; sign in and click Allow.
- In a chat, turn flowdraft on under + → Connectors. The connector belongs to your Claude account, so it works in the desktop and mobile apps too.
Claude Code
- Run this in your terminal: claude mcp add --transport http flowdraft https://flowdraft.tech/mcp
- Type /mcp, select flowdraft, choose Authenticate and allow access in your browser. The terminal can’t show the picture, so open the flowchart with the link.
Cursor
Add {"mcpServers": {"flowdraft": {"url": "https://flowdraft.tech/mcp"}}} to ~/.cursor/mcp.json, then click the sign-in button next to flowdraft in the MCP section of Cursor’s settings.
VS Code (Copilot)
Add {"servers": {"flowdraft": {"type": "http", "url": "https://flowdraft.tech/mcp"}}} to .vscode/mcp.json, or run MCP: Add Server → HTTP from the Command Palette. VS Code asks you to sign in when the server starts.
Codex and other tools that support remote MCP servers with OAuth use the same URL.
Ready-to-copy prompts for ChatGPT and Claude
Once connected, try one of these. The README prompt is for Claude Code, Cursor or VS Code.
- Use flowdraft to draw our customer return process as a swimlane flowchart with lanes for Customer, Support and Warehouse.
- Review the flowchart I have open in flowdraft, add any missing decision steps and label every branch Yes or No.
- Draw these steps as a top-to-bottom flowchart in flowdraft with a clear start and end: [your steps]
- Use flowdraft to map our new-hire onboarding and mark the manager’s sign-off as a human approval step.
- Draw the setup steps from this repo’s README as a left-to-right flowchart in flowdraft.
- The boxes in the flowchart you just drew look cramped. Space them out, highlight the key step and show me the new picture.
- Translate every label in the flowchart I have open into Turkish without changing the layout.
Example: what a single prompt produces
Here’s what a typical answer to the first prompt looks like in flowdraft: three swimlanes, two decisions, a rejection path and a damaged-item exception.
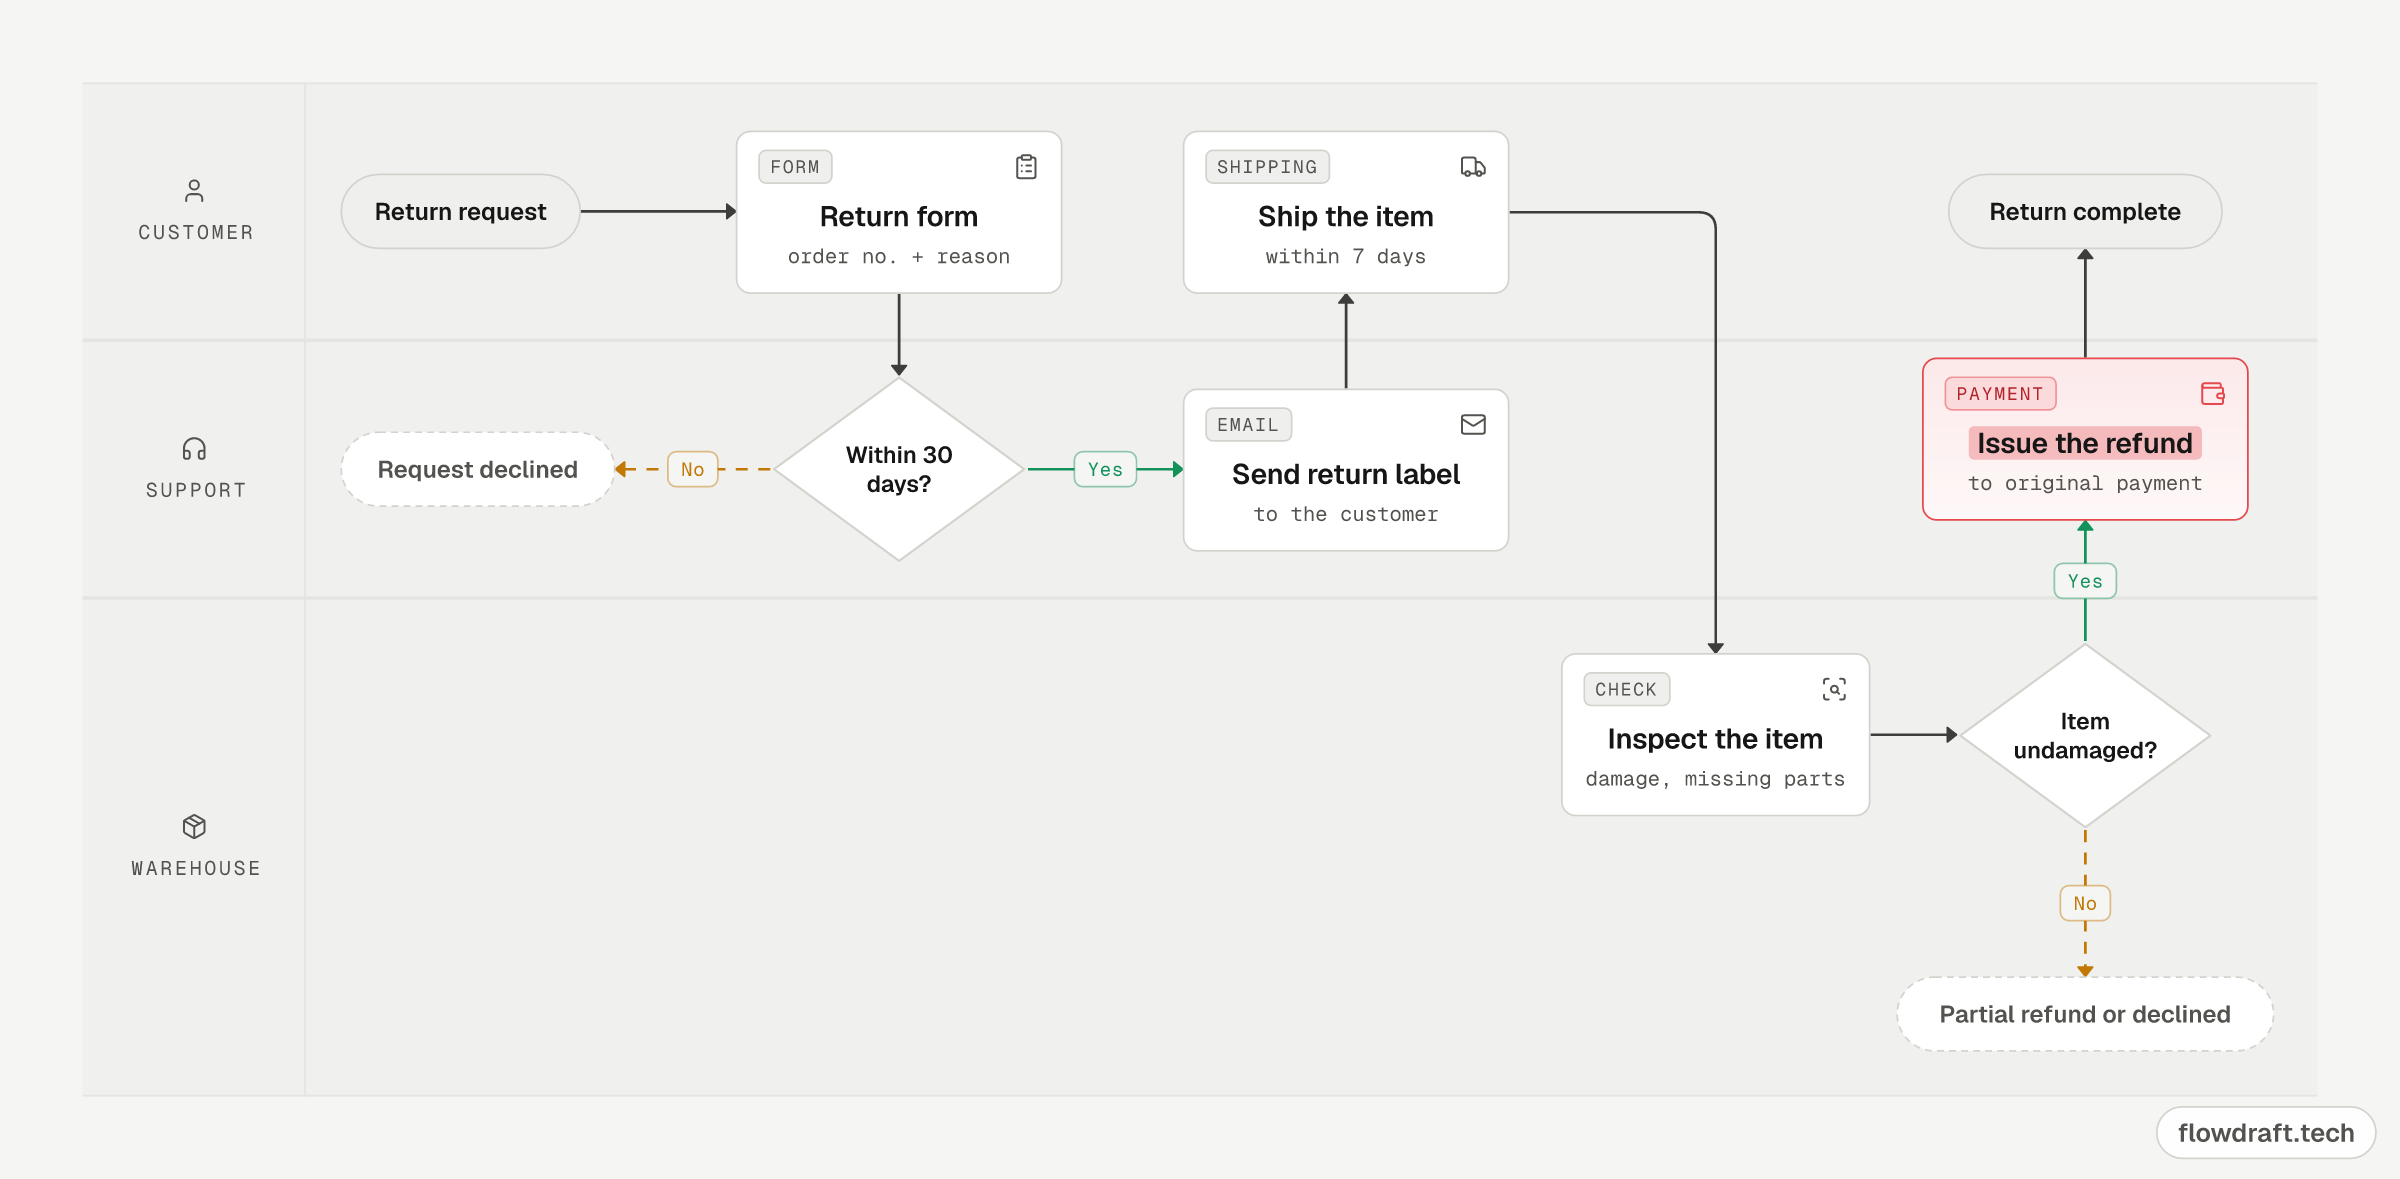
Every decision exit is labeled Yes or No, the main path is green, the exceptions orange, and the refund is highlighted as the key step. For a damaged item, support offers a partial refund or declines the return. Open it in the editor to adapt it, or browse more flowchart examples.
What the AI can and can’t do
It can
- List, read and summarize your saved flowcharts.
- Create flowcharts and update existing ones.
- Delete a flowchart when you clearly ask. Deleting is permanent.
- Read the flowchart open in flowdraft, unsaved changes included.
- Give you a link to the editor with each result, plus a picture of it in the chat in Claude and ChatGPT.
It can’t
- Access anything before you sign in and click Allow, and even then it reaches only your own flowcharts.
- Change a flowchart that was never saved to your account; save it first.
- Draw shapes flowdraft lacks, such as a separate parallelogram (input/output) or document shape; those become labeled step cards. The flowchart symbols guide shows how standard symbols map to flowdraft.
Privacy and access
- The connection uses OAuth: you sign in on flowdraft’s own page, and the AI tool gets an access grant, never your password.
- The tool you approve can list, read, create, change and delete your flowcharts, nothing else.
- While a tool is connected, the flowchart open in flowdraft is written to your account so the tool can read it. Turn this off with Share the open flow with connected AI tools under File → Connect AI tools.
- What the tool sees falls under its own privacy terms (OpenAI, Anthropic and so on).
- Revoke access any time: File → Connect AI tools → Remove access.
Tips for better results from an AI flowchart generator
- Name the tool. Starting with “use flowdraft to …” helps the AI pick the right connector.
- List the actors and decisions. Say who does the work and what happens at each decision; actors become swimlanes and outcomes become labeled branches.
- Pick a direction. Long processes read best top to bottom; swimlane processes, left to right.
- Keep it to one process. Split big processes so each flowchart fits on one screen.
- Fix in the same chat, back up first. Ask for a specific change rather than a redraw, and before a big change, save a copy with Export → JSON (editable).
- Finish by hand. Small tweaks are often quicker in the editor; the 30-second tour shows how it works. New to flowcharts? Read what a flowchart is first.
Frequently asked questions
Is it free to make a flowchart with ChatGPT and flowdraft?
flowdraft is free, and the MCP connection only needs a free flowdraft account. Any cost depends on your AI tool’s plan.
Do I need ChatGPT Plus?
Custom MCP connectors in ChatGPT go through Developer mode, which was offered on paid web plans (Plus, Pro, Business, Enterprise, Edu) when we wrote our setup guide; Claude’s free plan allowed one custom connector. Plans change, so check your AI tool’s settings.
Do I need a flowdraft account?
Not for the editor: without one, your drawing stays on your device as a draft. Connecting an AI tool, saving to the cloud and exporting need a free account.
Can the AI see other people’s flowcharts?
No. It only reaches the flowcharts in the account you approved. You can revoke access any time under File → Connect AI tools → Remove access.
Can I import Mermaid code into flowdraft?
Not directly; flowdraft only imports its own JSON format. But paste the Mermaid code into the chat, say “draw this in flowdraft,” and the AI can rebuild it as a flowdraft flowchart through MCP.
Is a Claude flowchart different from a ChatGPT one?
Not on the flowdraft side: both use the same server and show the picture in the chat. Only the setup differs: Customize → Connectors in Claude, Developer mode in ChatGPT.